John Nelson
Registered User
- Joined
- Nov 5, 2026
- Messages
- 4
Hello. I’m John, and I’m building an 8 X 10 pinhole camera. It may take some time, but I reckon that people who are comfortable with extremely long exposure times may be amenable to a saga that unfolds over weeks or months.
The evening before we left for a cruise around the British Isles, just after COVID, my wife bought a Canon DSLR camera and started her journey from beginner to increasingly accomplished enthusiast. Now she uses a Nikon mirrorless camera; I haven’t been able to muster up any interest in digital photography. But I have been pulled by nostalgia to memories of my mother’s Kodak Hawkeye Brownie camera from the 1960s, and later my first camera, a Kodak folding bellows model from about the 1930s. Once I got a part-time job while in high school, I bought myself a Zenit-E SLR. My grandfather emigrated from Fife to Canada in 1905 and when his doctor advised taking long walks after a heart attack just after WW2, he acquired a Rolleiflex TLR and darkroom equipment, and became a locally published photographer specializing in pastoral scenes and photos of working men. But I haven’t been anything more than a taker of snapshots in the intervening fifty years.
A few months ago, the YouTube algorithm presented me with a few videos of tin can and cardboard box pinhole cameras, and about room size camera obscura. It only took a few clicks and I became fascinated with the concept and especially with nicely crafted devices like the Zero Image products. It was inevitable that I was presented with Martin Henson’s channel, who kindly replied to a comment I posted, and then from his website to here. By that time, I had decided to build a camera.
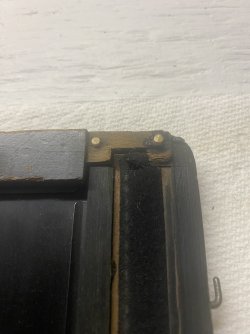
I chose to build an 8 X 10 because I anticipate that the resolution will be finer than for smaller formats. Maybe I’m wrong; we’ll see. The first step in my design process was to acquire a film holder to establish the external width and height of the box. I drew a blank at local camera stores, but found a Canadian supplier on eBay and bought one sight unseen. It is a Canadian Kodak Company model sporting the original Graflex patent number. It is a bit worse for wear, and needed some wooden plugs to repair worn screw holes where the aluminum strips attach to the wood frame, but otherwise it seems quite serviceable. We will see if there are light leaks when we take the first photos (eventually)! The cost was $70.00 CDN plus about $25 bucks shipping.
In the meantime, I bought Eric Reiner’s book “Pinhole Photography” from Amazon. I’ll need to re-read the first section about the philosophy of camera obscura, but spent time in the practical sections describing the Rayleigh equations and so on. Using that information, I reckoned that for a pinhole diameter of 0.4 mm the ideal distance from the pinhole to the film was about 120 mm. Now I had all three dimensions for the box.
I drew the design on graph paper and determined the exact dimensions based on thicknesses of the various component parts (the pinhole, its mounting sheet, the film holder, and so on). By then I had sourced laser cut pinholes from RealitySoSubtle in Paris and ordered a selection of 0.3 mm, 0.4 mm, and 0.5 mm pinhole discs. Very cost effective, only 25 euros including shipping to Canada.
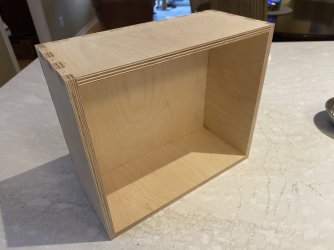
From watching YouTube videos of people who make things, I learned of a company in the USA that will cut and machine things from CAD files that you email to them. Presently, in Canada, many of us are trying to avoid spending money in the USA, and I found a similar service from a Montreal firm. I’m not skilled in making CAD drawings. My drafting training was focussed on HB pencils and set squares. But I found a website called makercase.com that allows you to input the dimensions of an open box and it will generate a CAD file for you to download. A simple box plan is free. With the CAD file in hand (so to speak) I submitted it to the CNC firm and selected 9 mm Baltic birch plywood to be cut by CNC router by umake.ca . A week later and voila! Five perfectly cut pieces arrived by post at a cost of about $125 CDN including shipping.
Not having multiple clamps, I decided to use tiny finishing nails to augment the glued joints. That seemed to work well, and the final product is square and strong.
The last accomplishment has been to buy some attractive veneer from a local exotic wood supplier. I selected an African wood called Semele, which has an interesting pattern of swirls, and is a reddish colour. The veneer cost about $40 CDN. Oh, and I bought a used clothes iron from a thrift shop to iron the veneer to the camera box using PVA glue. That set me back another $5 bucks!
What’s next? Attaching and finishing the veneer, drilling a 35 mm diameter hole in the front behind which the pinhole will mount, painting the interior flat black, making brass angles which will form the mounting slide rails for the film holder, making a brass shutter flap, attaching a tripod mounting flange, and possibly attaching a two direction level.
If you’ve read this far, thank you! Here is a photo of the film holder repairs, and the box as it is today.
The evening before we left for a cruise around the British Isles, just after COVID, my wife bought a Canon DSLR camera and started her journey from beginner to increasingly accomplished enthusiast. Now she uses a Nikon mirrorless camera; I haven’t been able to muster up any interest in digital photography. But I have been pulled by nostalgia to memories of my mother’s Kodak Hawkeye Brownie camera from the 1960s, and later my first camera, a Kodak folding bellows model from about the 1930s. Once I got a part-time job while in high school, I bought myself a Zenit-E SLR. My grandfather emigrated from Fife to Canada in 1905 and when his doctor advised taking long walks after a heart attack just after WW2, he acquired a Rolleiflex TLR and darkroom equipment, and became a locally published photographer specializing in pastoral scenes and photos of working men. But I haven’t been anything more than a taker of snapshots in the intervening fifty years.
A few months ago, the YouTube algorithm presented me with a few videos of tin can and cardboard box pinhole cameras, and about room size camera obscura. It only took a few clicks and I became fascinated with the concept and especially with nicely crafted devices like the Zero Image products. It was inevitable that I was presented with Martin Henson’s channel, who kindly replied to a comment I posted, and then from his website to here. By that time, I had decided to build a camera.
I chose to build an 8 X 10 because I anticipate that the resolution will be finer than for smaller formats. Maybe I’m wrong; we’ll see. The first step in my design process was to acquire a film holder to establish the external width and height of the box. I drew a blank at local camera stores, but found a Canadian supplier on eBay and bought one sight unseen. It is a Canadian Kodak Company model sporting the original Graflex patent number. It is a bit worse for wear, and needed some wooden plugs to repair worn screw holes where the aluminum strips attach to the wood frame, but otherwise it seems quite serviceable. We will see if there are light leaks when we take the first photos (eventually)! The cost was $70.00 CDN plus about $25 bucks shipping.
In the meantime, I bought Eric Reiner’s book “Pinhole Photography” from Amazon. I’ll need to re-read the first section about the philosophy of camera obscura, but spent time in the practical sections describing the Rayleigh equations and so on. Using that information, I reckoned that for a pinhole diameter of 0.4 mm the ideal distance from the pinhole to the film was about 120 mm. Now I had all three dimensions for the box.
I drew the design on graph paper and determined the exact dimensions based on thicknesses of the various component parts (the pinhole, its mounting sheet, the film holder, and so on). By then I had sourced laser cut pinholes from RealitySoSubtle in Paris and ordered a selection of 0.3 mm, 0.4 mm, and 0.5 mm pinhole discs. Very cost effective, only 25 euros including shipping to Canada.
From watching YouTube videos of people who make things, I learned of a company in the USA that will cut and machine things from CAD files that you email to them. Presently, in Canada, many of us are trying to avoid spending money in the USA, and I found a similar service from a Montreal firm. I’m not skilled in making CAD drawings. My drafting training was focussed on HB pencils and set squares. But I found a website called makercase.com that allows you to input the dimensions of an open box and it will generate a CAD file for you to download. A simple box plan is free. With the CAD file in hand (so to speak) I submitted it to the CNC firm and selected 9 mm Baltic birch plywood to be cut by CNC router by umake.ca . A week later and voila! Five perfectly cut pieces arrived by post at a cost of about $125 CDN including shipping.
Not having multiple clamps, I decided to use tiny finishing nails to augment the glued joints. That seemed to work well, and the final product is square and strong.
The last accomplishment has been to buy some attractive veneer from a local exotic wood supplier. I selected an African wood called Semele, which has an interesting pattern of swirls, and is a reddish colour. The veneer cost about $40 CDN. Oh, and I bought a used clothes iron from a thrift shop to iron the veneer to the camera box using PVA glue. That set me back another $5 bucks!
What’s next? Attaching and finishing the veneer, drilling a 35 mm diameter hole in the front behind which the pinhole will mount, painting the interior flat black, making brass angles which will form the mounting slide rails for the film holder, making a brass shutter flap, attaching a tripod mounting flange, and possibly attaching a two direction level.
If you’ve read this far, thank you! Here is a photo of the film holder repairs, and the box as it is today.