bamboozled

LEO

Popular Poster
Registered User
Joined
Mar 18, 2017
Messages
88
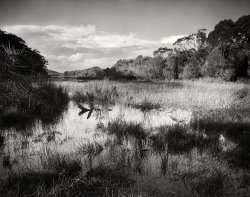
Hi all came across this scene at my local rock ledge famous for certain moments in life ... ;-)

I like the image as it is.... BUT.... I did try to get front to back focus and struggled "presumedly" because I was prob 50m high?

In forums, I read to tilt FS forward then focus my question is should I of tilted FS back so the rock 50m high would be sharp and the clouds with a good small APP... or have I not got this totally wrong? again ;_)

many thanks Paul Leonardo_ Dont Jump.jpg

 
Using tilt to change the plane of focus depends a lot on the camera you are using.

Most images require the technique where you focus on the distant subject, tilt the front standard, re-focus the distant subject and check the near focus, make adjustment to the front standard tilt.....repeating until you have the desired plane (or both near and far points) in focus.

Stopping down then gives you depth of focus either side of the plane of focus.

Wide angles need less tilt compared to standard or telephoto lenses, but you need to be careful to make sure you don't tilt so much as to move the image circle out of the image position.
 
  • Like
Reactions: LEO
Hello Leo,
My guess (and it is only a guess) is that you have tilted a little too far and the plane of sharpest focus dives into the sea about halfway up the frame, just beyond the foam at the edge of the lower (submerged?) rocks. You have actually got all the rocks beautifully sharp, so well done.
Perhaps you wanted to have a sharp horizon line and the sea sharp too. You need greater depth of field.
The procedure is to focus on the the upper rock, and on the horizon, by front tilting, just as you did. Then you will have to rely on stopping down to get everything sharp.
Let's suppose you have already adjusted the tilt to give a sharp horizon and a sharp upper rock.
You re-focus, (using the focus rack, not by tilting) so that the upper edge of the stopped-down depth of field lies on the upper rock and the lower edge on the surface of the sea. The plane of sharpest focus will lie in the air and nothing will look sharp until you stop down. I hope this is moderately clear. It's a problem that the volume of sharp focus is wedge-shaped after you tilt, and the narrowest part of the edge is next to the camera.
It will obviously be very tricky. It might need re-iteration of these steps. There might be tables available to look up the necessary figures, but I don't really know. Merklinger, perhaps? It may even be impossible, or you might need unacceptably long exposure times.
I'm sorry that this isn't a magical answer to the problem. If anyone has better advice, I'd be very glad to hear it.
 
Hi David ;-)
hope your well!
thanks for the impeccable reply, I believe you are right in regards to over tilting, the problem is it doesn't make sense in my head! aahhrr !
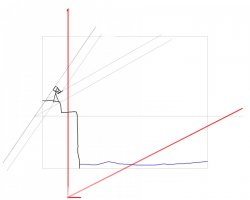
the diagram/scribble shows location + actions loosely... the red line is I'm guessing is what you are implying? I think ;-) prob not at that angle.

The writing is on the ledge below the tripod, that is where I focused, now I tilted yes as far as it would, to try to get the horizon line sharp but could not achieve it?

my note indicates 5th @ F11 to throw focus on the foreground but having a little interest in the ocean leading to the light "fitting with subject location" as stated I'm happy with what I have achieved and visualised.

what I cannot get a round my head is ....

I can shoot a lake landscape get it sharp as a tact front to back no probs fully understand it ....then I come across this where my plane of focus needs to be from my feet to 50M below and beyond and my head cant get around it!

I do belive that it is just a matter of closing down but still, I can't see reason, a nice learning curve for me ;-)

hopefully for others also

DAM RAW 25X31 nice print   .jpg


Untitled-1.jpg
 
It looks like two problems. 1) Providing tilt to get the ledge and the sea visible just past the ledge in focus (ignoring the horizon). 2) Getting the sea in focus from the nearest visible point to the horizon.

Those are two different planes. I think the only way to do it is to use tilt to get the ledge and the nearest part of the sea in focus. Get the near and far distances (probably by focus rail separation), and work out the depth of field for nearest point of the sea to infinity. Stop down to the indicated aperture, and tweak the focus a little towards infinity if needed.

Tilt, or any movement, only works to focus one plane. You can think of the 'wedge' as the effect of depth of field at distance - it gets larger. Not strictly accurate optically, but I can get my head around DoF effects at different distances. It's a practical model of what happens.

This set up is analogous to a field with a tall tree in the middle. Tilt will give you the field in focus, but you need DoF to cope with the height of the tree. You can play with the tilted plane of focus, but the DoF is also needed.

This is theoretical - I have not stood on that cliff myself :cool:
 
  • Like
Reactions: LEO
cracking answer! thank you ! just what I needed Now it makes sense.
I hope this may help others too !
onto the next problem ! thank you forum community such a pleasure being on this site !
 
Everybody is right.
Leo's excellent diagram illustrates the difficulty. In Lake, the hinge point is at ground level, whereas in Don't Jump it needs to be (more or less) halfway down the cliff.
Have you come across Harold Merklinger? He wrote two books and probably much more.
The Ins and Outs of Focus deals with sharpness in a new way by asking what we want to see sharp in the subject, rather than on the film plane.
Focusing the View Camera deals with just that, but in a mathematical way, so that he assesses a scene, measures various parameters and then sets his camera accordingly. He has compiled tables to make this easier in the field. I cannot put my hand on my own copies, but I believe they are now available as free PDF downloads. [...a pause here, as I search.]

Focusing the View Camera
http://www.trenholm.org/hmmerk/FVC161.pdf

There is an addendum, which I didn't know about:
http://www.trenholm.org/hmmerk/FVCADNDM.pdf

The Ins and Outs of Focus:
http://www.trenholm.org/hmmerk/TIAOOFe.pdf

They are not light bedtime reading but they are a change from the usual "focus-tilt-focus-re-tilt-re-focus..." method that is often suggested (and which I still use). The illustrations are not chosen for their aesthetic appeal but to illustrate Mr Merklinger's points. Other people have commented on his methods, but I'll leave that to them.

I do hope this is useful.
 
Last edited:
There is another solution, but to my mind, not a satisfying one.
Take one image, just like the one you have, with the soft horizon. Then, leaving the tilts exactly as they are, refocus on the distant sea, allowing the text to go out of focus. Use the same exposure for both, develop them exactly alike and scan them both at the same settings. It might be prudent to take a third, intermediate negative of the middle distance, neither one nor the other, just in case. I must concede that moving waves might create problems.
And now, in Photoshop... No need to detail the rest of the story. It might salvage the image even if it's not a purist solution. It's not an ordinary seascape; the text on the rock make it unique.
Owners of DSLRs would have no qualms about this, and boast of their own cleverness and the general wonderfulness of their camera and its firmware. I dunno...
 
Film photographers have been merging, blending and manipulating images since the year dot and most of the tools available in PS and the like owe their very existence to those early film practitioners. So, unless you are a forensic, press or documentary photographer, the end product is all that matters as far as I am concerned and David's solution is probably the only one that will give you what you are after Leo. What you have to accept is that no matter what movements are available and no matter how much you stop down the lens, the laws of optical physics will alway determine whether an objective is achievable or not and in this case I believe you are stymied for a one-shot solution.

Personally I rather like the image as it is, perhaps symbolising the less than perfect one-shot solution to what is being contemplated by the tragic person standing at the top. :(
 
Hello Keith,
You are quite right. It could be done in the darkroom. It's a very long time since I've tried such a thing, but it does remind me of those Victorian printed-in skies. On the easel, it would be much the same problem of adding the top half to the bottom half and making it all look convincing. Two Ways of Life shows just what can be done with multiple negatives.
As you say, there's nothing wrong with an out-of-focus horizon. Maybe we (that is, me) are just unused to seeing LF images with unsharp parts. Leo's Lake is sharp from front to back and top to bottom. Perhaps we accept it more easily in portraits, where there seems to be a convention of OoF backgrounds.
On the other hand, this is a very interesting LF problem. If you look at textbooks, the use of movements is almost always described for tall objects rising above the ground plane. Here we have a subject with negative height, if there is such a thing. A similar problem, the "right way up" might be looking through a doorway with important detail, at a high decorative ceiling beyond. A cathedral, perhaps? (I believe that Kodak once explained an unsatisfactory image with the phrase "subject failure" but I'd need to research that to be sure.)
An alternative rendering might be to keep the text and the horizon sharp and allow the lower rock and foam to be softer. Blurred foam might be more acceptable.
More extensive finessing with tilts and much more drastic stopping down might improve matters, but as you and Scottie say "Ye canna break the Laws o' Physics."
 
tahe 'Don't jump' might be mor effetctive with if replaced the 'DO not jump' with "It's Not the jump that hurts... it's the suddden stop at the bottom"

Ken
 
  • Like
Reactions: LEO
I took this one from the top of the steps. It took me over 2 1/2 hours trying to work out how to get everything sharp. In the end, it was a case of a small back tilt on the front standard and placing the line of sharp focus through the the gutter on the house on the right to the bottom lamp on the left of the steps.

BrelevenezEscaliersDuSommet.jpg
 
Back tilt is an unexpected solution. As the verticals are vertical, presumably some drop front, too?
 
thanks, Joanna, I've been trying to understand it more by doing short depth of field shots so I can see it clearer.
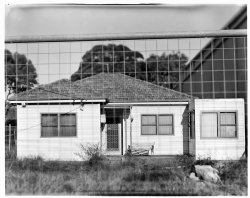
for anyone learning on this forum I believe this would be relatively close to what you are saying.
thanks for you stunning colorful image. I named this unobtainable to hilight the lac of affordable housing in Sydney as this house or let's say land sold for a mear 7Milion.

shot in harsh light over exposed X2 under developed by half the normal time Foma 200 rated @ 80 iso shot on linhof lens 180
 

Attachments

  • unobtainable 02 13x19 sploge .jpg
    unobtainable 02 13x19 sploge .jpg
    631 KB · Views: 15
I take it you intentionally used a fairly large aperture for that one, seeing s how there is only a narrow strip of sharp focus?

I used around f/22 or f/32 for my shot to get the whole scene sharp.
 
that's correct I was just demonstrating to myself the dof and angle, so it became clear in my mind . I also loved the the security fencing disappearing to the sharp focus of the front door. I appreciate beautifully composed pretty pictures but I always get stimulated by saying something in my images, more than just a pretty picture if I'm to quote my mum, this is why I named it unobtainable as the fence stops you but as you look at the house it allows you to see the full picture ... FYI mum doesn't like too many of my images :)
 
I do like the two grids, one of the fence and one in the door. If I were being picky, I'd like to have seen the fence either dead square or more definitely angled.
Perhaps (but I don't know) it might be possible to make an angled shot with the plane of sharpness running through the door and a corresponding vertical strip of the fence, by using front or rear swings, or both. It might not be a picture, but it would be an exercise in control.
 
  • Like
Reactions: LEO
Back
Top